
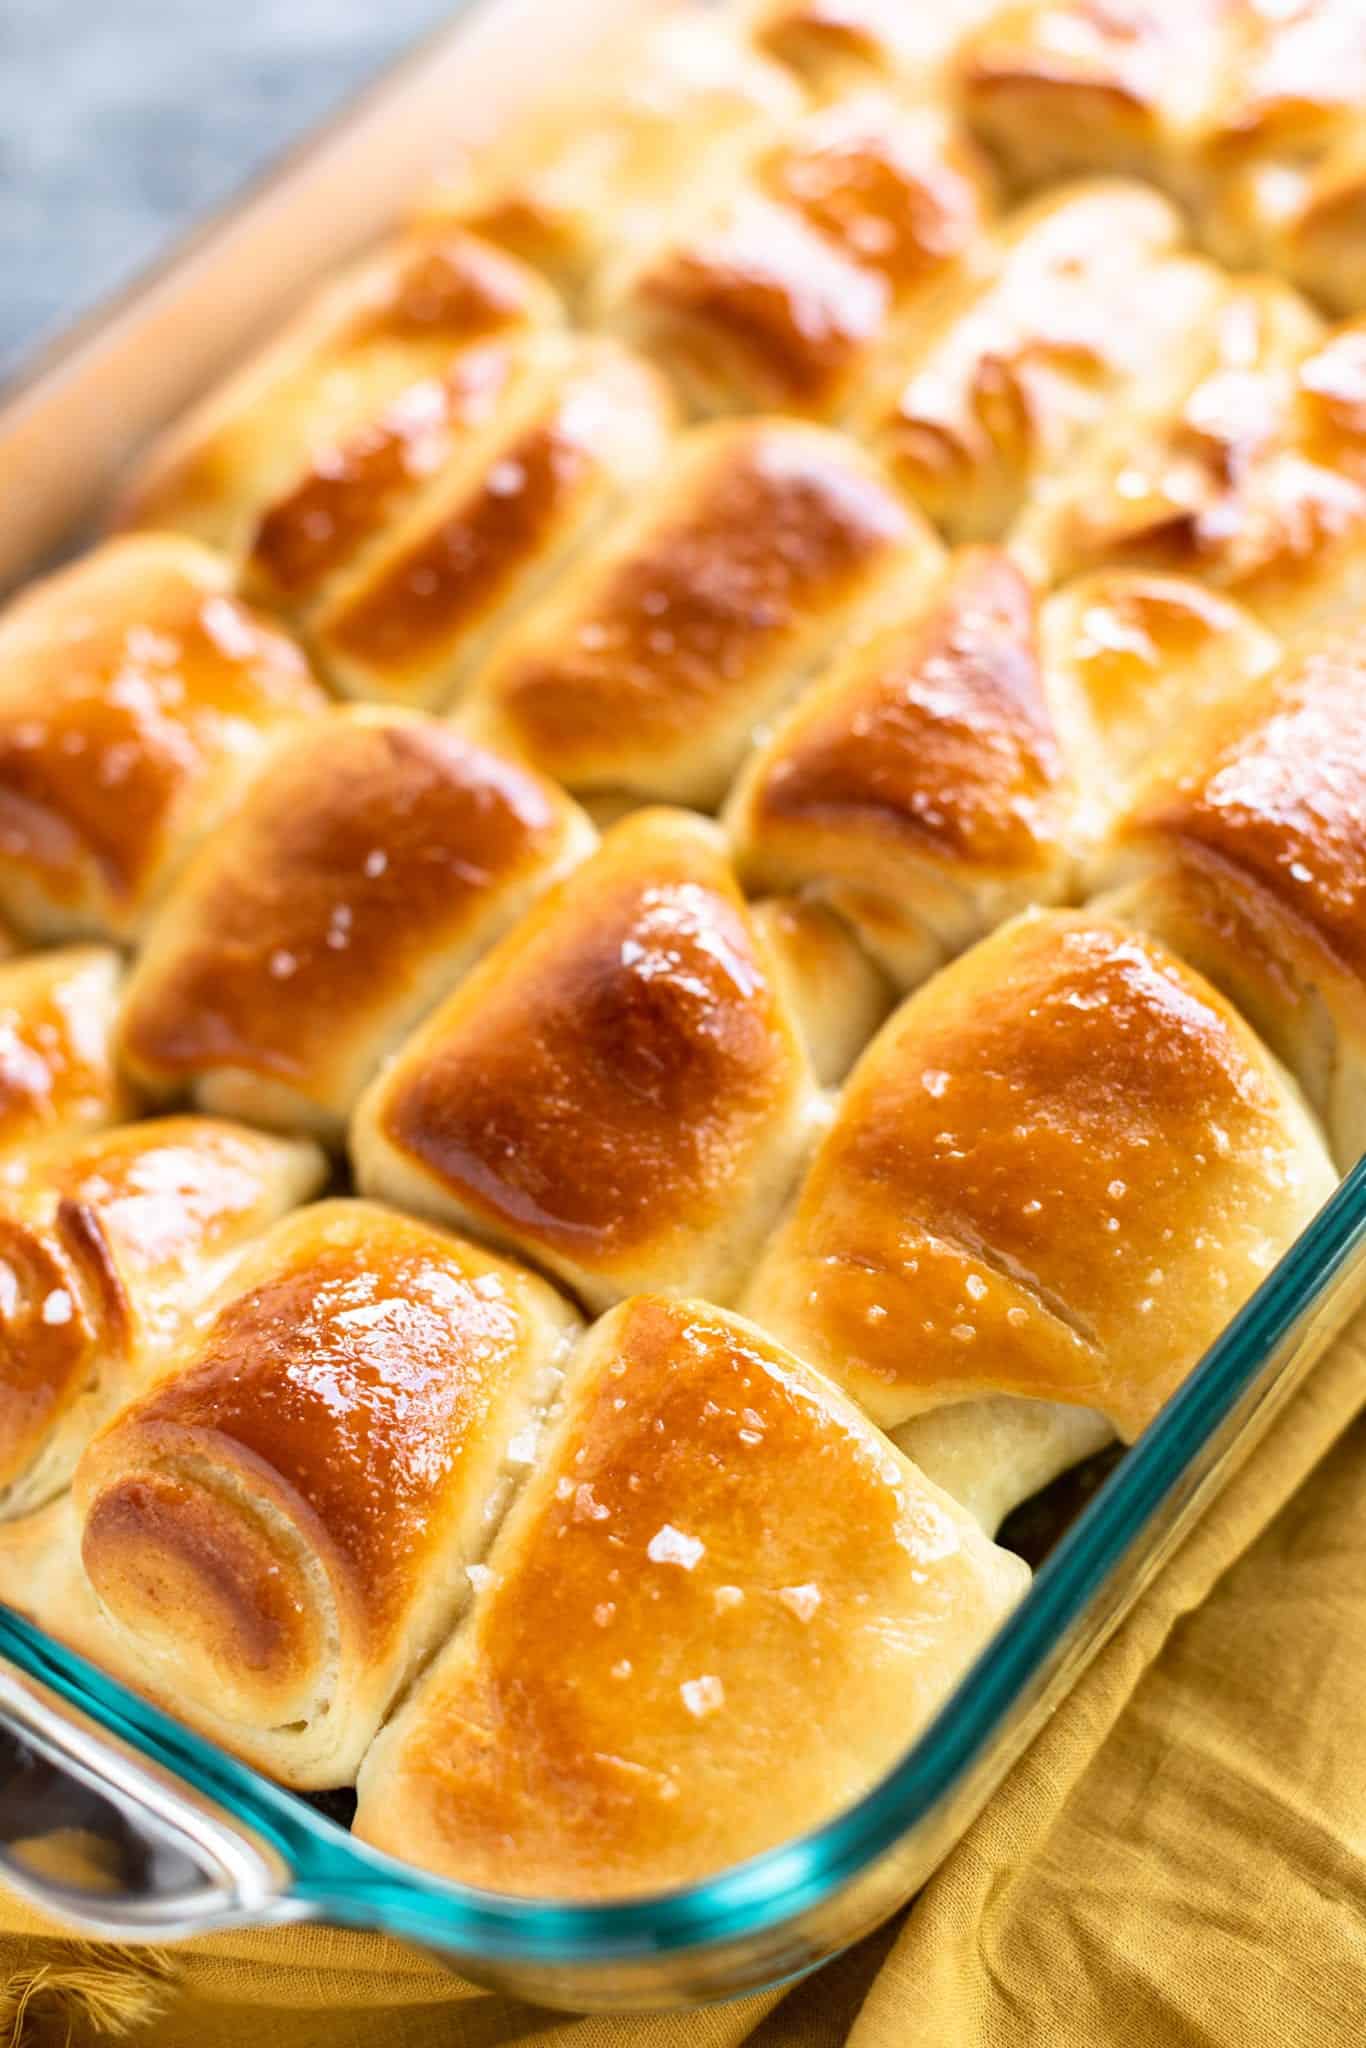
These salted honey butter rolls are, without a doubt, my favorite rolls I’ve ever made. Pillowy-soft and oh so delicious, these rolls are decadently buttery with hints of sweetness from the honey. There’s seriously nothing like them, I’m salivating right now just writing this.
This recipe is my twist on the famous Parker House-style rolls. Instead of folding them once in half, I like to brush the rolls with flaky sea salt, honey, and butter before rolling them like pinwheels to lock in all of that incredible flavor so that every bit of the roll is coated. The ultra-soft enriched dough we use provides a texture unlike any other, one that will have the whole family reaching for seconds the moment they take that first bite.
Flaky, soft, and slightly sweet; these salted honey butter rolls are what dreams are made of. The smell alone is enough to have your neighbors stopping by to get a taste of whatever has the whole block smelling so heavenly, so what are you waiting for? Grab your ingredients and let’s get started!
Ingredients:

How to Make Salted Honey Butter Rolls:
{printable version with measurements below}
- Heat milk to 110°-115°F. Add 1 tablespoon of white granulated sugar and add yeast. Set aside for about 10 minutes to let the yeast activate (it should rise and get foamy).
- Meanwhile, add egg, softened butter, and honey to your stand mixer and combine ingredients.
- Once yeast has activated add it to your stand mixer and combine with other wet ingredients.
-
With stand mixer on the lowest speed setting, begin adding flour (and sea salt flakes) one spoonful at a time. The dough will start out sticky, but as the gluten developes it will take on a more elastic springy texture. Knead the dough with your stand mixer for an additional 3-5 minutes after all flour has been added.
*If the dough still seems sticky (you should be able to poke at it without it leaving residue) gradually spoon in an additional ¼ cup of flour.

- After kneading the dough for a few minutes cover your stand mixer's bowl with plastic wrap and let it rest for 30 minutes (or up to a couple hours).
- While the dough is resting lightly grease a 12x18 or 9x13 nonstick rectangle pan or dish. Prepare salted honey butter in a small mixing bowl, melt and combine honey, butter, and sea salt flakes.

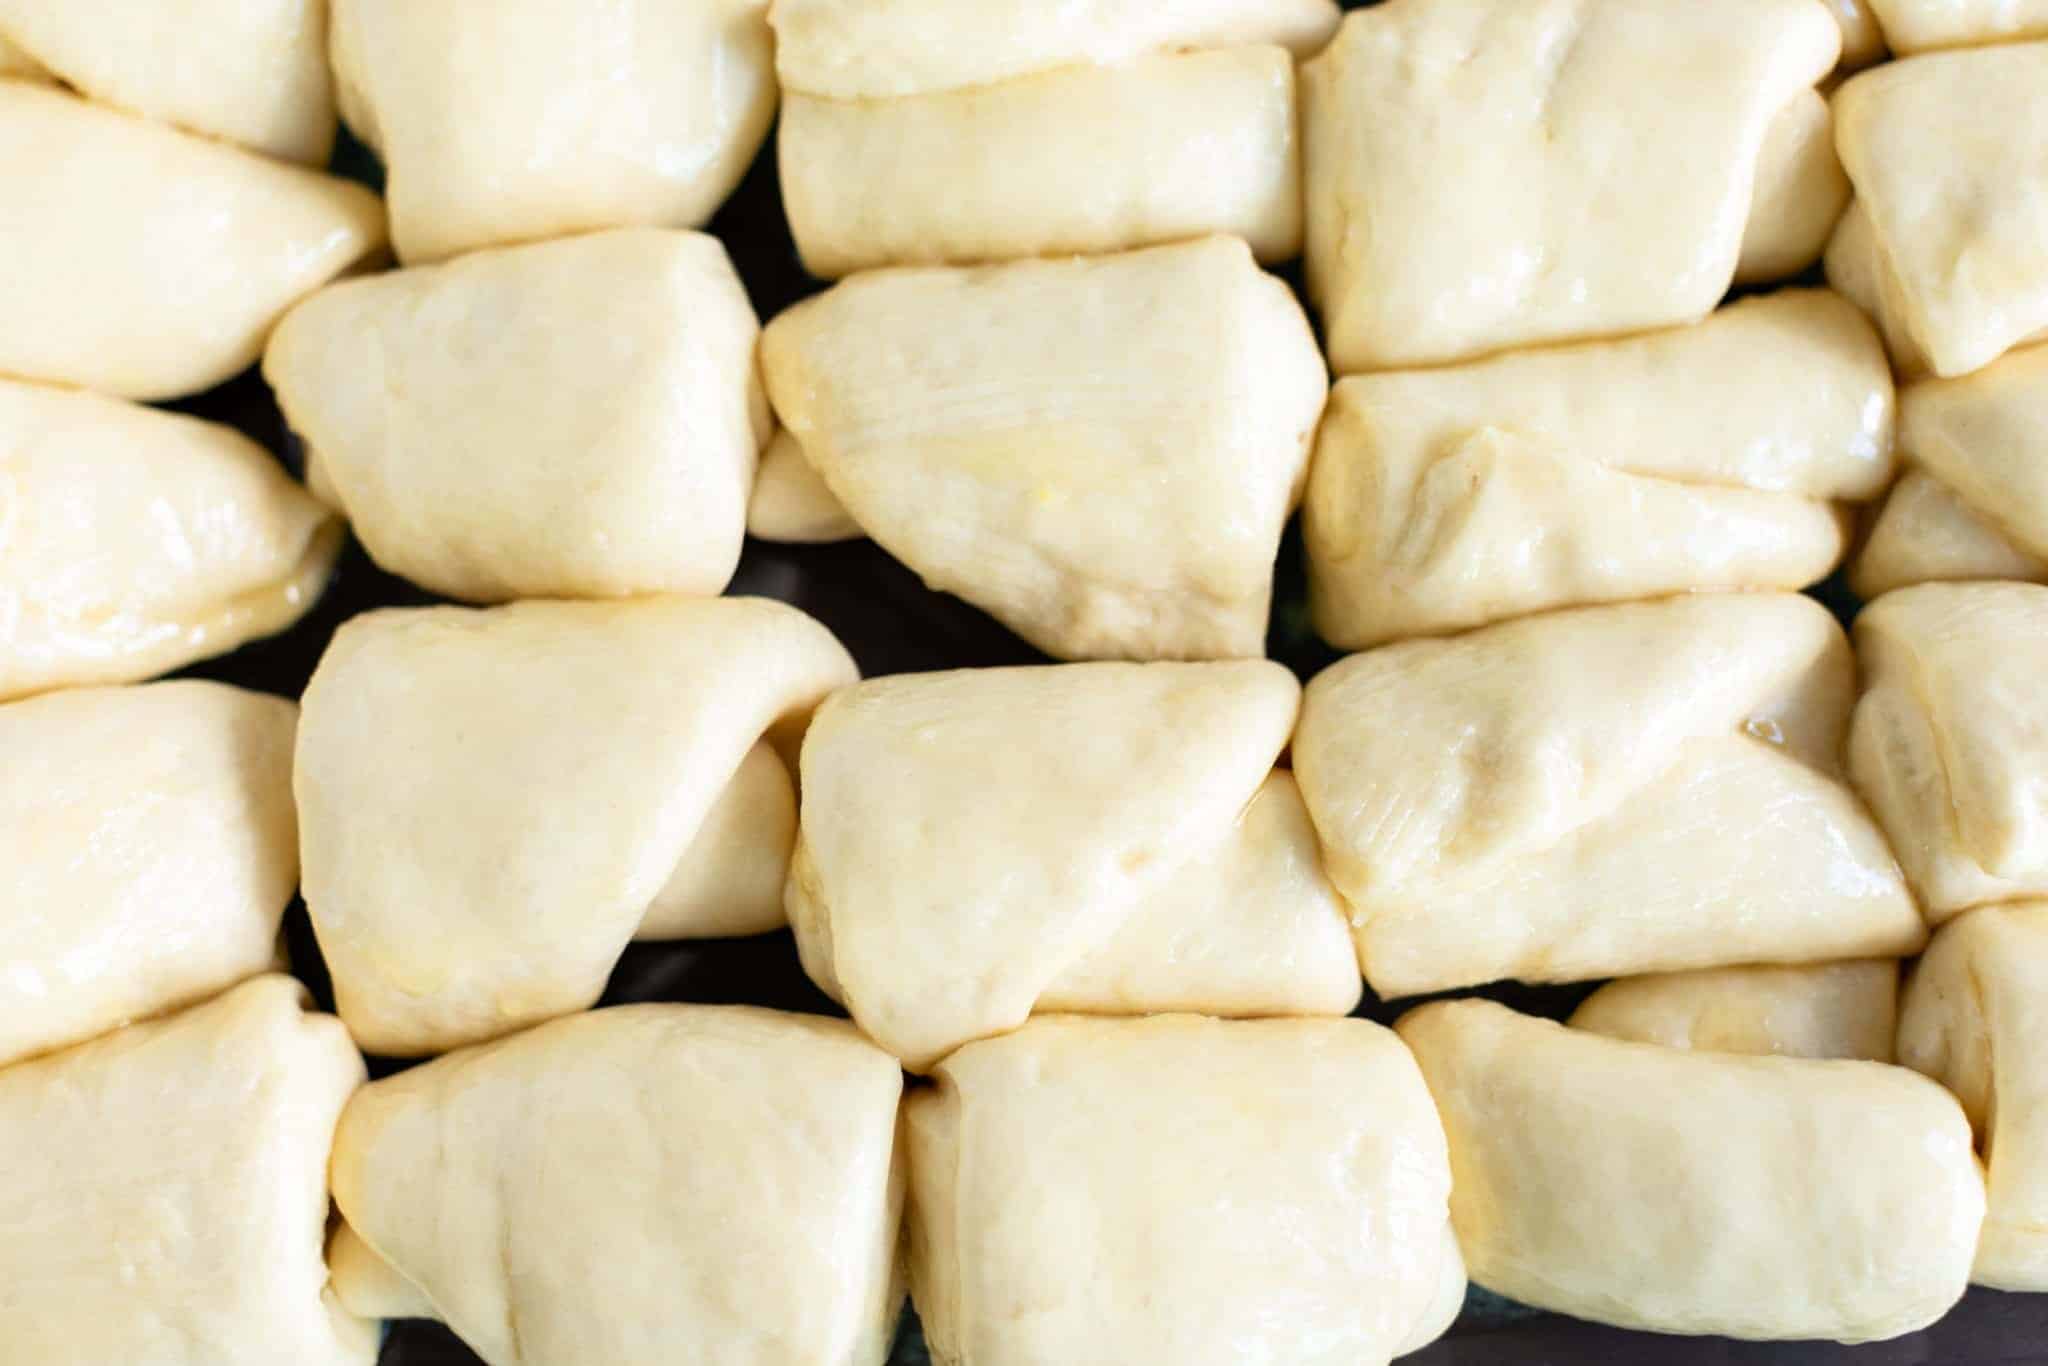
- After you have given the dough time (30 minutes) to rest and rise a bit remove it from mixing bowl. Divide the dough into 24 equal portions and lightly coat rolling pin with flour. Roll dough flat and even about ¼ inch thick. Lightly brush rolled dough with salted honey butter using a pastry brush and then roll it up (see picture or video) and place it in greased baking dish.
- (I typically divide the dough into 4 equal parts, then divide each quarter into thirds. Then I cut each third in half.) Just try to keep the sizing even! *if you want bigger rolls feel free to change your portion size, but anticipate a different bake time!
- Evenly space rolls on prepared baking dish leaving room for them to proof and expand. Cover baking dish with plastic wrap or wet towel and leave it to rise in a warm area for about 2 hours. This proofing time is essential for rolls to become airy and light, so don't cut it short!
- Set a timer for an hour and a half to preheat your oven. This gives your oven half an hour to preheat while bread is still proofing*) Preheat the oven to 350° F with convection on (You can absolutely make these rolls in a conventional oven without convection. Just keep an eye on the bread because the cook time will change a bit. They usually bake for 8-10 minutes with convection on, it might be closer to 12 minutes without convection. You might also need to rotate the pan halfway through to get an even bake*)
- Set a timer for an hour and a half to preheat your oven. This gives your oven half an hour to preheat while bread is still proofing*) Preheat the oven to 350° F with convection on (You can absolutely make these rolls in a conventional oven without convection. Just keep an eye on the bread because the cook time will change a bit. They usually bake for 8-10 minutes with convection on, it might be closer to 12 minutes without convection. You might also need to rotate the pan halfway through to get an even bake*)

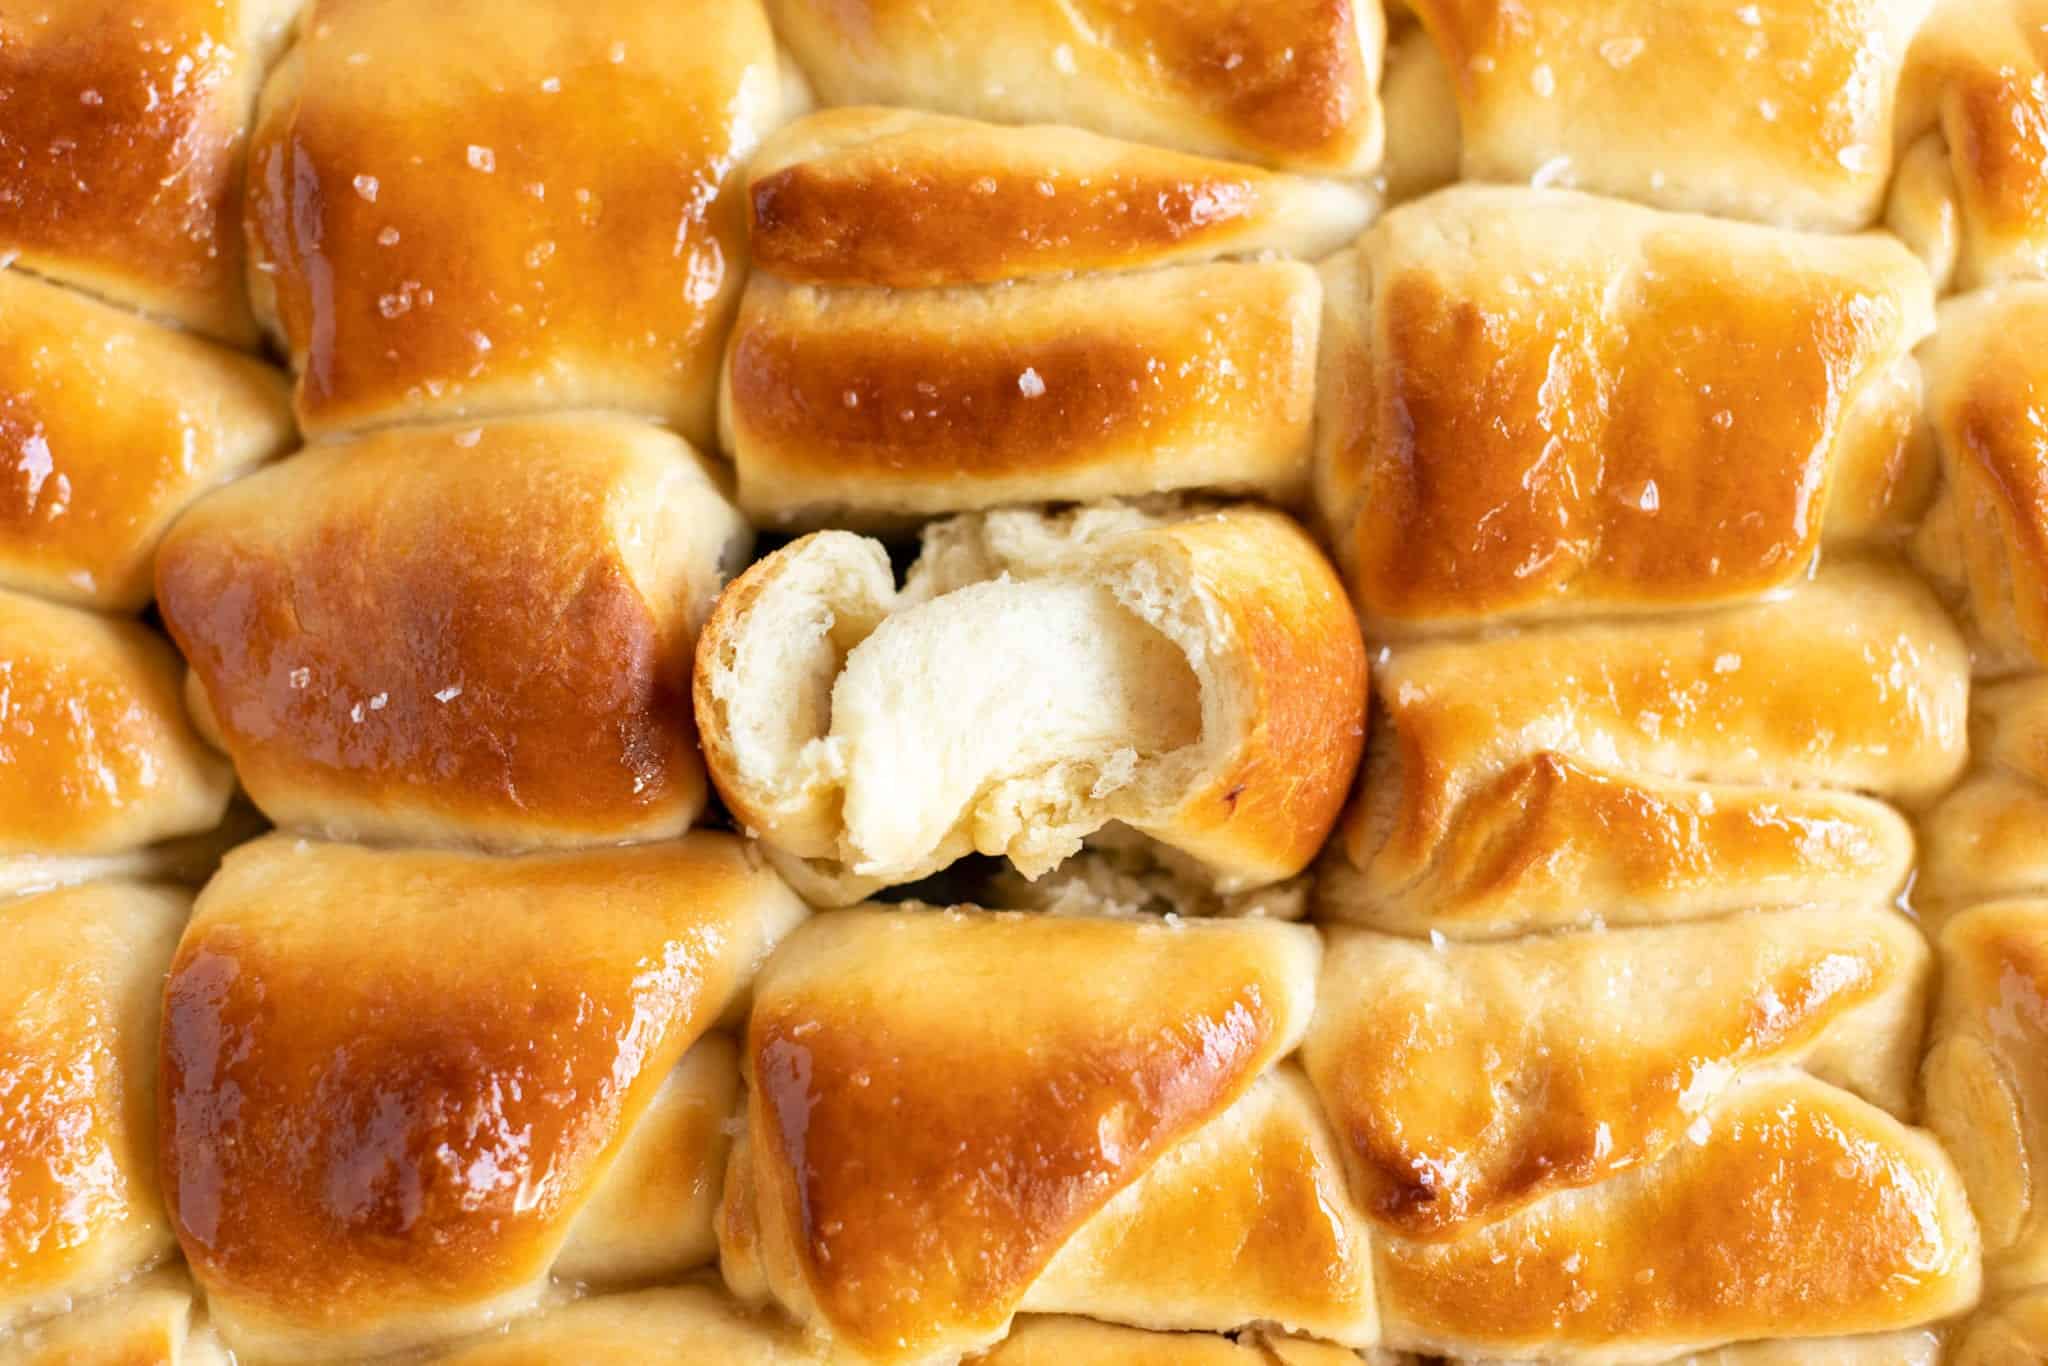
- Rolls should double in size and be touching. Gently brush salted butter on the rolls lightly coating all the visible areas.
Shop My Favorite Kitchen Essentials for this Recipe!
click photos for links!


- Transfer rolls to the oven and bake for 10-15 minutes until the top of bread looks evenly golden brown across the top.

- When rolls are ready to come out of the oven brush them with remaining honey butter one last time and sprinkle with sea salt flakes.
Tips:
- The proof time on these rolls requires a bit of patience, so make sure you have plenty of time the day you make them (trust me, they’re worth it!)
- I use Maldon Sea Salt Flakes both in the dough and for the topping; it makes a huge difference in the flavor and in the presentation. The amount needed for the recipe wouldn’t be the same with regular table salt, so you’ll DEFINITELY want to use sea salt flakes!
- I’ve had trouble in the past with my cutting board moving around while I’m trying to roll or chop. To keep your cutting board from sliding, wet a napkin and place it underneath! It’s seriously a lifesaver. It’s also important to use a sturdy, high-quality cutting board. Check out the signature cutting boards made from scratch by my husband and me in our Etsy shop!
eat & enjoy!
Looking for some other delicious recipes? Check these out!
click photos to link to recipe!


DID YOU MAKE THIS RECIPE? I WANNA SEE! Tag @bingeworthybites on Instagram and hashtag it! #bingeworthybites
Looking for MORE recipes? Don’t worry, I gotchu. Try sesame soy roasted edamame, sea salt caramel apple [oatmeal] cookies, perfect Fall pumpkin muffins, or my favorite pumpkin roll delight!
*This post may include affiliate links. As an Amazon Associate I earn from qualifying purchases.

Salted Honey Butter Rolls
Ingredients
- 1 cup milk, warm (about 110°F) (I have made this recipe with fat free, whole, and 2% milk and they all work really nicely)
- 2 teaspoon sugar
- 2¼ teaspoon red star active dry yeast
- 3 tablespoon honey
- 4 tablespoon unsalted butter, softened
- 1 egg
- 3⅓ cups bread flour OR all purpose flour (plus a bit more if needed)
- 1 teaspoon sea salt flakes *Maldon sea salt flakes is my preferred brand, but any sea salt flakes should work!
Salted Honey Butter
- 4 tablespoon unsalted butter, melted
- 2 tablespoon honey
- ½ teaspoon sea salt flakes *Maldon sea salt flakes is my preferred brand, but any sea salt flakes should work!
Instructions
- Heat milk to 110°-115°F. Add white granulated sugar and yeast. Set aside for about 10 minutes to let the yeast activate (it should rise and get foamy).
- Meanwhile, add egg, softened butter, and honey to your stand mixer and combine ingredients.
- Once yeast has activated add it to your stand mixer and combine with other wet ingredients.
- With stand mixer on the lowest speed setting, begin adding flour (and sea salt flakes) one spoonful at a time. The dough will start out sticky, but as the gluten develops it will take on a more elastic springy texture. Knead the dough with your stand mixer for an additional 3-5 minutes after all flour has been added.*If the dough still seems sticky (you should be able to poke at it without it leaving residue) gradually spoon in an additional ¼ cup of flour.
- After kneading the dough for a few minutes cover your stand mixer's bowl with plastic wrap and let it rest for 30 minutes (or up to a couple hours).
- While the dough is resting lightly grease a 12x18 or 9x13 nonstick rectangle pan or dish. Prepare salted honey butter in a small mixing bowl, melt and combine honey, butter, and sea salt flakes.
- After you have given the dough time (30 minutes) to rest and rise a bit remove it from mixing bowl. Divide the dough into 24 equal portions and lightly coat rolling pin with flour. Roll dough flat and even about ¼ inch thick. Lightly brush rolled dough with salted honey butter using a pastry brush and then roll it up (see picture or video) and place it in greased baking dish.(I typically divide the dough into 4 equal parts, then divide each quarter into thirds. Then I cut each third in half.) Just try to keep the sizing even! *if you want bigger rolls feel free to change your portion size, but anticipate a different bake time!
- Evenly space rolls on prepared baking dish leaving room for them to proof and expand. Cover baking dish with plastic wrap or wet towel and leave it to rise in a warm area for about 2 hours. This proofing time is essential for rolls to become airy and light, so don't cut it short! Set a timer for an hour and a half to preheat your oven. This gives your oven half an hour to preheat while bread is still proofing*) Preheat the oven to 350° F with convection on. (You can absolutely make these rolls in a conventional oven without convection. Just keep an eye on the bread because the cook time will change a bit. They usually bake for 8-10 minutes with convection on, it might be closer to 12 minutes without convection. You might also need to rotate the pan halfway through to get an even bake*)
- Rolls should double in size and be touching. Gently brush salted butter on the rolls lightly coating all the visible areas.
- Transfer rolls to the oven and bake for 10-15 minutes until the top of bread looks evenly golden brown across the top.
- When rolls are ready to come out of the oven brush them with remaining honey butter one last time and sprinkle with sea salt flakes - EAT & ENJOY!
Sara Kennedy
LOVE LOVE these!!!
Callie
Hi Sara!! Thank you so much!! ❤️❤️❤️
Sharon
Callie,
I do not have a convection oven. Can they be baked in regular oven and does the baking time change ??
Callie
Hi Sharon!
Yes! You can absolutely make this in a conventional oven without convection. Just keep an eye on the bread because the cook time may change a bit! They usually bake for 8-10 minutes with convection on, my guess is it may be around 12 minutes in a conventional oven. 😊 I can’t wait for you to try these rolls out! I hope you love them!
- I will go in and make a note for conventional ovens on the recipe- thanks for commenting!
Hope you’re staying safe and eating great food,
Callie ❤️❤️
Deborah Brown
Well To This May Concern!!!!! Well I Wanted To Let You Know I've Always Wanted To Make Home made Bread And Rolls !!!!!I Don't Have A Stand Up Mixer,Or Any Mixer At This Time!!!!!!I Would Love To Learn How To Make Bread!!!!Home Made Bread!!!!Thank You For Listening To Me!!!!!Sincerely Deborah Brown
Anita Parris
Hi Callie,
These rolls look so delicious!!😋
Since I'm Gluten Sensitive I'm going to try to make these with my 7 year old granddaughter we love baking... is there any different bake times for gluten flour for this recipe?
Phyllis. Jones
Love rolls will try
Chelsea
This sounds delicious!!Have you made this in a bread maker set to the dough setting and then form the rolls to bake in the oven? New baby, homeschooling and teaching leads to less time to bake bread but I love it if I can let the bread maker do most of the work and then I do the last touches 🙂 I look forward to hearing your thoughts.
Callie
Hi Phyllis! Bread rolls are my FAVORITE! I hope you love these! ❤️❤️❤️
Callie
Hi Anita!
I haven't tried this recipe yet with gluten free flour, but if you use Bob's Red Mill 1:1 Baking flour you should be able to make it following the same measurements! The bake times will vary, but very slightly. It seems like the 1:1 GF baking flour bakes a tiny bit faster, but just keep a close eye on it and take it out when the top looks nice and golden! ❤️ I am thrilled to hear you're baking this with your granddaughter! I hope you both love it as much as I do ❤️
Callie
Hi Chelsea! FIRST of all, Congratulations on the little one!!! ❤️❤️❤️ You sound like you really have your hands full!
I have not tried using a bread maker for this recipe yet! Does your bread maker have a "sweet bread/enriched dough setting"? If so use that for the initial mixing and first round of proofing!
I proof this bread 2 times to make it extra fluffy and soft. 🙂 Just be sure to proof the rolls a second time after you've rolled them out before before they go in the oven (the second proof is where they get big and pillowy!)
Callie
Hi Deborah!
Thank you so much for commenting! ❤️❤️❤️ Please please please treat yourself to a stand mixer and make fresh bread with me!!! I think you will love it! I would say you can do it by hand, but because this is an enriched dough it might require a little too much elbow grease! haha 😂